
PHOTO MANIP.
A step by step photo manipulation tutorial.
Good day people! First, I would like to make myself clear that I am a “self-taught” photoshop user, not even qualified to be called Graphic Artist, somehow when I said “self-taught”, I mean there are no rules and infinity is my limitation as to “trial and error” is my diversion. Weeww…. done explaining! : )
Photo Manipulation as to what my own dictionary says; it is a process of creating new photo/graphic from any kind of photo/s (graphics, lines etc.) with an aim of deceiving one’s naked eye.
Requirement: Adobe Photoshop 7 or any upgraded version
To begin with: think of something new, maybe something weird or something you can/wanna do on these photos.

Step 1:
Create NEW document, with black background. Now we need a photo of a cloud then place it to our document, I named this layer “cloud”,
- go to Edit -> Free Transform -> Distort and reduce the size of cloud, erase the edges using Eraser Tool.

Step 2:
Duplicate the cloud layer then
- go to Edit -> Free Transform -> Flip Horizontal
then drag it to the bottom of your document. As you will be using Free Transform you will probably need to keep working with it until details are in good position.

Step 3:
Bring in the Petronas tower photo, make sure to erase the background then play with the
- Free Transform > Distort setting.
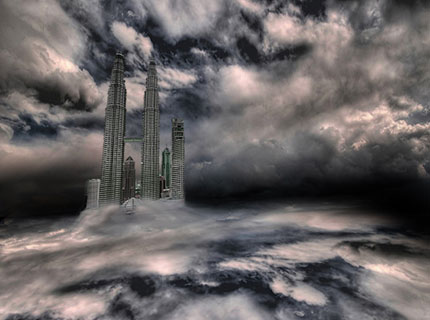
- After that go to Image > Adjustment > Hue/Saturation and set (Hue=-50, Saturation=-50, Lightness=-20); we do that to match in the background color. Use the image below as reference.
Step 4:
Import the Lighting effect photo, erase the background and again play with the
- Free Transform > Distort setting; set the Blend Mode to Lighten. . I named this layer as “lighting”, position this layer above the “cloud” layer.

Step 5:
Import the Fire effect photo, play with the
- Free Transform > Distort setting; then position anywhere in “Petronas” for as long as it will looks real. You might as well need to duplicate “fire” layer to add some effect.

Step 6:
Final touch, making some adjustments. As you can see, we’re done in manipulating photos however there’s a lot we can do. We can adjust the color of clouds to add some drama.
- Select “cloud” layer, go to Edit > Adjustment > Color Balance set (Cyan=85, Magenta=-5, Yellow=-25) after that, set the Brightness and Contrast to -50 and -10.
- Select the Cloud at the bottom of document, go to Edit > Adjustment > Hue/Saturation set (Hue=0, Saturation=-50, Lightness=-50) then go to Edit > Adjustment > Color Balance set (Cyan=85, Magenta=-5, Yellow=-25) after that, set the Brightness and Contrast to 45 and 25.

Step 7:
Maybe we can duplicate the “lighting” and “fire” layers to make it a little disturbing and a little adjustment on Petronas’ Color Balance will do as well.

FINALE:
You can add more elements to the image but remember make it realistic and always careful to the details. Experiment and explore, there are many ways to achieve the same result. HAVE FUN


wow, thanks Tina. interesting! galing, ‘yun lang pala yun haha.
Thanks Tins for joining us! regular kana dito ha!! more tutorials!!!
Malaysia Kay Ganda! (hihi)
Pilipinas…Truly Asia than Malaysia!
Thank you, thank you!
More tutorials… sure, no prob! ^^