
Here’s one of the basic tutorials in Photoshop CS4 using Blur and Overlay effects. Overlay could help you achieve burnt effect to your image. This is the original image that I will use.
")
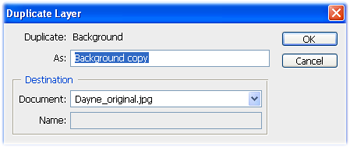
1. Open the image in Adobe Photoshop and go to Layers, right click the image thumbnail and then select “Duplicate Layer”

2. Confirm duplication by clicking “OK”
3. You will now have two images thumbnail in the layers palette. Now select “Background Copy”

4. Go to Filter Menu, click Blur then select “Gaussian Blur”
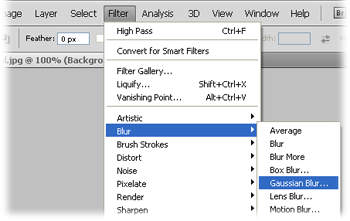
5. Select Radius “5.0” or it depends on the size of your image., (ideal: 5-10pixels). Click “OK”

6. After the Gaussian Blur, go back to your layers palette, from Normal select “Overlay”

That’s it!
Now, here’s the before and after effects.
")
The above method makes the image more lively and vibrant.
Image model: Dayne Marienne M. Matira – Oriental Mindoro, Philippines

There are 3 key things for good photography: the camera, lighting and… photoshop – Tyra Banks


pretty nice. could use this one. 🙂
—
Taragis: Thanks Super e!!
Taragis, ive tried this method. 🙂
—
Taragis: thanks Tsi!
Yun oh! haha astig!
Masubukan nga.
—
Taragis: woo lawyer in the house!! welcome atty.
nice tutorial.
Nice.. I’ll try it later.. 🙂
—
Taragis: haha this comment was the real TARAGIS! – ‘coz your my mentor in PhotoShop!!
TARAGIS! eto lang pala ang sikreto! in fairness ang dali lang pala! post more about photoshop. para hindi na kita istorbohin just to make my pictures pretty! hehehehe!
—
Taragis: haha secrets revealed!? thanks france! see you around!
I’ve used Gaussian blur and overlay effects on my shots! And then I’ll tell myself, I’ve gone good at photography! ;]
Cheers for a new blog!
—
Taragis: cheers ax! nice idea! haha.
great tuts po..salamat po ngaun alam kuna..bobo po kc ako dito sa photoshop..grrrrrrr LOL
—
Taragis: haha thanks natawa ako sa “tuts” parang may na sensor lang.hihi
hmmm…Joel, is this you?
I use Gaussian blur talaga for editing photos, especially when i am given hard copies and I just scan them…pantanggal ng imperfections. hehehe…
thanks for the valuable tips…
oh, and i was struck by the beautiful girl. what a darling!
—
Taragis: haha thanks Mommy Kaye. yes, what a beautiful girl!
Arigato Gozaimasu… Tarageez… You’re the best!!!
Domo arigato…
—
Taragis: moshi moshi! haha thanks Japonicum
Are wa nan desu ka?
ahhh! thanks for the tip. i’ve been using the burn tool and then adjust the brightness and contrast! haha. thanks thanks! we’ll be back for more tips!
—
Taragis: Thanks Ced! you are always welcome here!
wala ka ba jan pampagandang lalaki sa picture?
hehehe!hindi na yata kaya ng photoshop mukha ko…TARAGIS!
—
Taragis: haha magandang lalaki kana! nagrereflect sa mga doodles mo! =)
TARAGIS!!! another simple tip but definitely with great results.
and more TARAGIS for Dayne’s shot, thanks to TARAGIS.COM.
—
Taragis: wooo haha salamat batangmangyan!
more! more! more!
congrats sa new blog na ito bon! galing!
Blur and Overlay effects din ba ung nasa sidebar ko na gawa mo? hehe.
—
Taragis: salamat father! overlay nga po yung ginamit ko sa picture mo.. ^^
Kuya bons este kuya taragis bakit close ang station? under construction pala.
Hindi ako marunong mag PS pero magagamit ko ito. Kasalukuyan ko ding pinagaaralan ang PS.
Be blessed po!
—
Kuya Taragis: haha thanks Pong. maglaro tayo sa PS, wala namang mawawala. =) theres always a room for improvement! Thanks again pong, selos ako kay bonistation may badge ka na nya! ahaha!
dito pala bagay tulad kong kapiranggoat ang alam.
hawig ng pamangkin ko ung bata.
—
Taragis: haha, wag ganun. ^^ anyway thanks for visiting!
some people call this softening glow. cool and easy trick! 🙂
—
Taragis: yep, thanks TDB! your name? in my mind its TIDBITS! ^^
Naks, i just re-installed Adobe Photoshop just because you posted this. I tried this on one of my photos, and it’s real nice! thanks kuya bonbons!
Wow. you made it very easy for us. 🙂 Thanks. very helpful for post processing. 🙂
ei master! walastik ngayon ko lang binasa ‘tong post na ‘to.. sinabayan ko ng hands-on sa CS3.. ang galing! thanks for sharing this ah..
btw.. ang ganda na ng taragis.com.. pang international na ang looks! =)
love ko ang dramatic effect kuya bons. 🙂
how about ung using ung gradient overlay in photos in PS cs3?
excited nako 4ur reply.. 😛
Hi Sows! =) thanks for your comment! ^^ subukan kong gumawa po nun! salamat uli sows!
cge kuya bons, il be waiting..pagod nako kasi mag experiment. panay failure.
huhu. chos.
gud pm kuya! usta? 😛
found your site on del.icio.us today and really liked it.. i bookmarked it and will be back to check it out some more later